
Key takeaways:
PV module manufacturing has evolved into a multi-step, precision-driven process where tabbing, stringing, layup, bussing, and lamination must operate seamlessly at high throughput
Inspection and stabilization steps, particularly EL testing before and after lamination, are critical, as defects become irreversible once the module is sealed
Automation now extends across the entire assembly line, from cell loading and string handling to bussing, framing, and junction box installation, reducing manual intervention and improving consistency at scale
Module making is all about interconnecting a desired number of cells and packaging them to protect against environmental stresses. While this sounds like a simple 2-step process, executing it in mass production requires multiple process steps and advanced machinery. These include several auxiliary and inspection tools that enhance the core 2-step process in delivering commercial-scale, reliable, and high-quality PV modules.
In a classical sense, the module production step actually starts with tabbing and stringing. However, the slicing of solar cells, initially into 2 pieces, and now increasingly 3 or 4, has become the state of the art. This can be accomplished at the end of cell lines or as the first step in the module fabs. When the input is already sliced cells, the first step in module production is tabbing and stringing. In this process, ribbon wires are soldered to the cell busbars on either the front or rear side – a step referred to as tabbing. These ribbons, extending from one cell, are then soldered to the busbars on the opposite side of the adjacent cell. This establishes a series connection between the 2 cells. This process is called stringing, in which several cells, typically 9 to 13, are connected in series to form a string (or a cell string). Both tabbing and stringing are usually carried out using combined tabber and stringer (CTS) equipment.
The speed and accuracy of tabbing and stringing steps have evolved significantly over time. With speed comes inaccuracies in alignment and mechanical issues such as cracks and soldering defects. These can be detected using inspection systems integrated within the tool. A modern CTS machine inspects the incoming cells and also the final output, which is a string. At this stage, it is still simpler to deal with the defects and rework the strings to prevent them from entering the final assembled module.
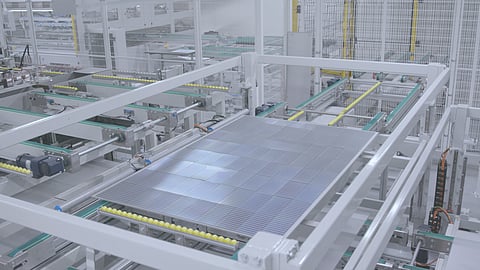
Following the stringing process, the cell strings enter the auto layup station. The interface is either single- or dual-channel, from which the layup machine, using a pick-and-place method, lays the cell strings onto an encapsulant placed on the front glass. The laying of strings depends on the module design. After this process, the final module’s appearance becomes clear in terms of layout and cell orientation, and one can mostly determine the intended application of the final module. The layup is typically performed using either a gantry robot or a vacuum-arm robotic system. In a conventional module design, the strings are laid on either side of the central line of the module length, along which the junction boxes consisting of diodes are installed. The complete arrangement of strings on the glass and encapsulant stack is referred to as a string matrix, except that the individual strings are not connected to each other.
This brings us to the next station: bussing. Given that it is automated in modern production lines, it is often called auto-bussing. In this step, all the strings on either side of the module’s central line are connected in series, while the 2 string groups across the centerline are connected in parallel. All these connections are fulfilled using wider busbars. This completes all electrical connections within the module except for the junction box. The wider busbar segments along the central line are bent upward at certain points to accommodate 3 split junction boxes. Following bussing, a rear stack consisting of encapsulant and glass or a backsheet is placed on the top of the string matrix. This assembly is conveyed to the next process step – lamination.
The incoming material to the laminator is simply a sandwich of the string matrix, encapsulant layers, and front and rear glass. In this step, the sandwich is permanently bonded to physically enhance the lifespan of a PV module. The process is irreversible, meaning that the cell matrix is inaccessible for any rectification and sealed for the module’s lifetime. Therefore, thorough inspections are carried out in the pre-lamination section to ensure only healthy strings and matrices with no defects pass this stage. This is done with electroluminescence (EL) imaging to identify any defects at the string or cell level. Depending on the equipment design, lamination can be carried out either in a single-level or a multistack process. There are also single-, 2-, and 3-stage laminators. In single-stage laminators, vacuum, heating, and pressing are performed in a single chamber. This type is commonly used in laboratories or R&D lines. In a 2-stage process, these steps are done in different chambers. In 3-stage laminators, the laminate is actively cooled, whereas in other approaches, cooling is performed in an ambient environment. While the lamination quality itself is not affected by the equipment type, throughput and equipment footprint differ significantly between these configurations. A post-lamination EL inspection helps identify any defects originating from this step.
Post-lamination steps involve installing the junction box on the rear side and attaching the frame. The junction box is filled with potting compound that requires curing to protect the diodes inside from the outside environment. After curing, the junction box is closed with a lid. This sequence completes the assembly of the PV module.
Once the module is fully assembled, it undergoes electrical characterization, commonly referred to as I-V characterization. This is achieved using sun simulators, which simulate the sunlight indoors to measure the module’s electrical performance under standard test conditions (STC). Based on the IV characteristics, the modules are labeled and sorted by power rating.
Automation has become a critical element of PV module production equipment and overall assembly lines. It has significantly improved machine throughput and reduced costs. These ancillary tools can perform complex, labor-intensive activities with high precision and minimal errors or defects that were once common with manual handling.
At the stringer level, for example, recent automation advancements have enabled the loading of sliced cells into the CTS machine without human intervention. There are a number of supportive tasks in a module assembly line that safeguard overall fab output, in terms of both quality and quantity. For example, layup cannot proceed without first preparing the glass and encapsulant stack, which involves glass lifting, encapsulant unrolling and cutting, and finally conveying to the layup station.
As the laid-up matrix is conveyed to the bussing station, the strings are taped to fix their position so that the spacing is not disturbed. This was previously done manually, but ‘auto-taping’ is a common step across all tier 1 and 2 module makers. Bussing is another process that relies on automation and involves cutting and precisely aligning busbars to the layup. Bussing itself was largely manual until a few years ago, but it has since become fully automated. In some cases, both layup and bussing are integrated into a single piece of equipment. Before lamination, there is the edge taping process that fixes a tape running along all edges of the laminate. After lamination, the excess encapsulant is trimmed before the frame is fixed. Automation of these simple tasks reduces labor costs to some extent. Similarly, post-lamination processes such as junction box installation, frame attachment, and junction box sealing, which were manual in the past, are now fully automated in today’s giga-scale factories.
The text is an edited excerpt from TaiyangNews’ latest Market Survey on Solar Module Production Equipment 2026, which can be downloaded for free here.

